If you've ever had a glitching screen, a crashing PC, the blue screen of death — you know, just a totally unstable computer — or games and video applications that keep glitching up, failing, awful frame rates — and you google it, you're gonna inevitably run into tons of people telling you the issue is your graphics driver. This is the most commonly given advice:
The issue is your graphics driver — uninstall your current one and reinstall an older version.
For what it's worth, I think this fix is waaaay overstated. (Case in point: the nvlddmkm.sys crash every forum blames on the GPU — usually it isn't the hardware.)
It's the go-to fix on numerous forums and tech websites for any visual issue or crash with your PC, and honestly, in my experience, it's usually not a driver issue. So before you go through with this, I suggest you read this article on ruling out the other potential causes first — especially the ones with easier fixes.
That being said, while it's a well-overplayed fix, it's overplayed for a reason: driver updates can be a notorious pain in the ass. Also, if you do a clean driver uninstall and rollback and you've still got problems, well then at least you've ruled out a driver mismatch or driver-capability issue.
Alright, so I'm gonna break this down for you in a painless way to do it, and note a couple of caveats you don't want to forget or miss.
A few things to know before you start:
- Your files are totally safe. Photos, documents, programs — everything is good, safe, not touched. We're just swapping one piece of software, a graphics driver, for an older one.
- This'll take about 20 to 30 minutes, and you're gonna have to restart your computer a couple of times, so make sure you've got the time to do it.
- Your screen might look a little weird partway through — big icons, blurriness, maybe a black flash. That happened to me a few times. It's expected, it's temporary, so don't stress when it happens.
And in a nutshell: a driver — when people say "graphics driver" or "audio driver" or whatever driver — is just a piece of software that lets the operating system talk to that piece of hardware, in this case the actual graphics card. That's all it is.
The tool you'll need: DDU
We're gonna need a particular tool to do this cleanly. It's called DDU — Display Driver Uninstaller — and what it does is make sure there are no leftover bits of the old driver software left behind during the reinstall. So you're gonna want to grab that.
Download DDU (Display Driver Uninstaller) — the official source is wagnardsoft.com.
Don't skip this part: BitLocker
Before you begin — this is one of the major gotchas on this whole thing. Make sure you either have BitLocker off, or, if it's on, that you know what your recovery key is. This can ruin your day. It can turn a simple job into a big problem, and not enough people mention this when they tell you to go do this graphics driver reinstall.
So what is it? BitLocker is an encryption feature that computers use to basically scramble your hard drive for security so nobody can access it. And if you have it turned on, Windows will usually demand a 48-digit recovery key before it'll let you start back up and access your hard drive. If you don't have that key, you could be locked out of your own computer. You can get it from another device — like just logging into your Microsoft account — but before we do anything, we're gonna find out the status of your BitLocker.
Checking if BitLocker is on
Method 1 — through Settings. Honestly not always the cleanest way, but it works:
- In the search bar, type "settings" and open it up.
- Click System on the left.
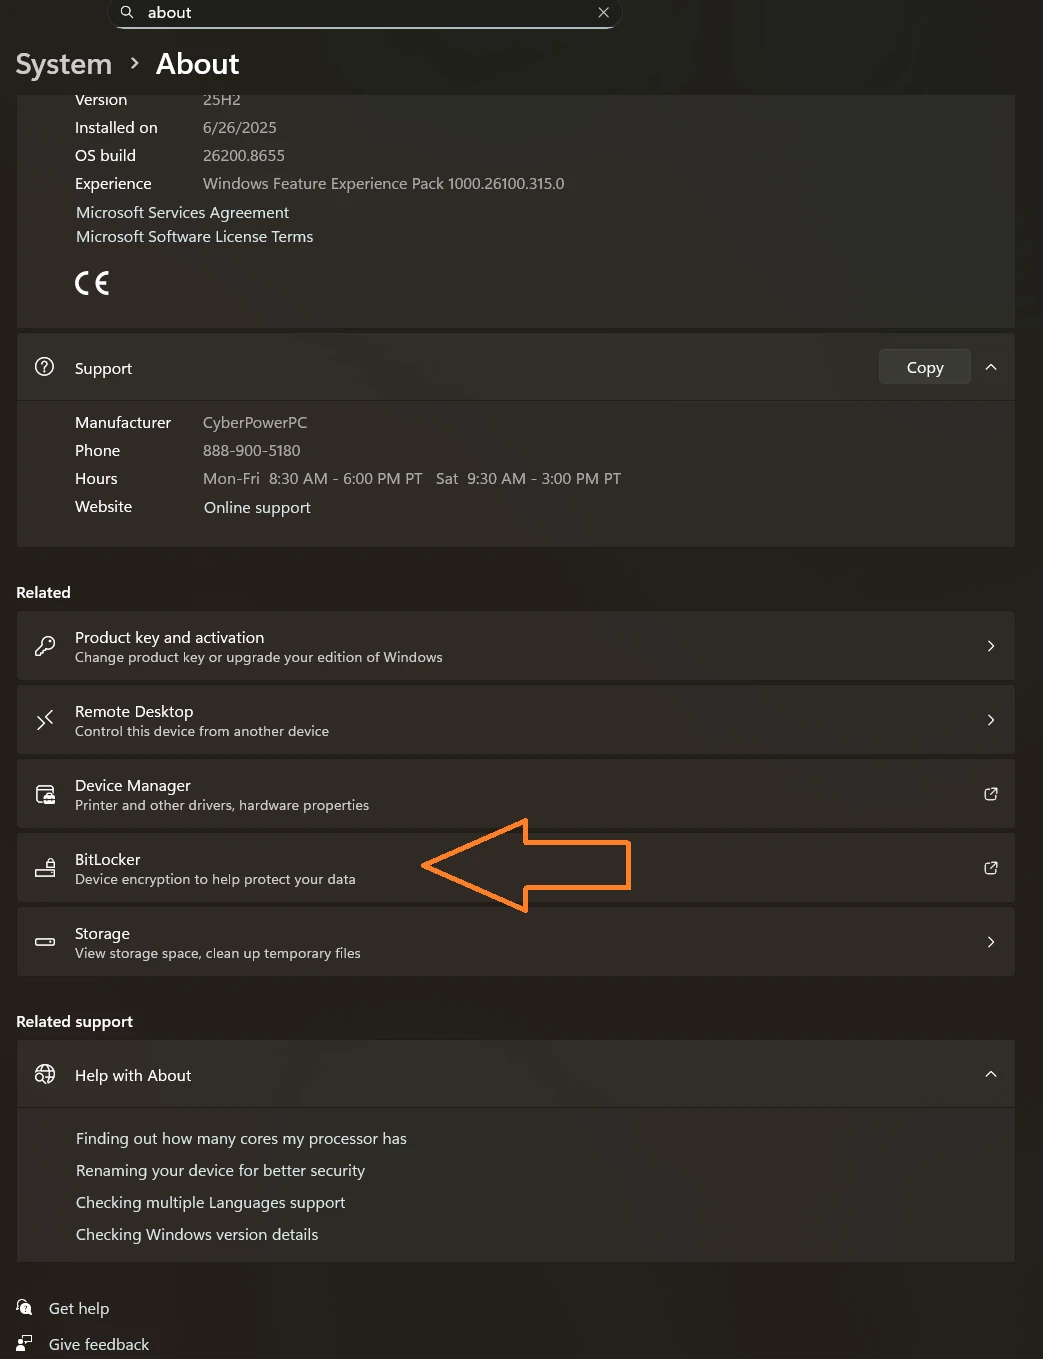
- Scroll all the way to the bottom to About (or just search for "about").
- At the bottom of System > About you'll see BitLocker-related settings — click BitLocker.
Method 2 — through PowerShell (the way I like). Don't be intimidated by PowerShell — I know it can look like you're doing some hacker-level stuff, but you're not. It's just a way to run your computer without a graphical interface.
- Type "powershell" in the search bar, right-click it, and choose Run as administrator (click Yes when it asks — you're not changing anything, just giving the program admin rights).
- Type
manage-bde -statusand hit Enter.
ERROR: An attempt to access a required resource was deniedIf you get this error while using PowerShell, it simply means that PowerShell isn't running as admin. Close it, and then reopen it with administrator permissions:
Right-click PowerShell, then click Run as Administrator.
Type in manage-bde -status, hit Enter.
It'll tell you exactly what's going on — and if you've got two drives, it reports on each one separately.
manage-bde -status in PowerShell to check Conversion Status and Protection Status.So if it says Fully Decrypted, you're good to move on. If it shows a BitLocker version, a conversion status, and a protection status that's On — then you're gonna want to go grab your recovery key.
If BitLocker is on → you need to get a recovery key
Okay, so if BitLocker is indeed enabled, you'll need to get your recovery key from Microsoft.
- Go to your Microsoft account (you almost definitely have a Microsoft account, even if you don't remember creating one): account.microsoft.com/devices/recoverykey or aka.ms/myrecoverykey.
- That'll bring you right to your recovery keys — you'll see a list of your computers/devices and their respective recovery keys.
If you see recovery keys here, it does not automatically mean BitLocker is on. A lot of the time you just have to make a recovery key when you're setting up a PC, whether or not encryption ends up enabled. Personally, I had about a half dozen recovery keys listed and I've never used BitLocker.
- Write down your recovery key or use your phone to snap a picture of it. If you download it, make sure you're downloading it on a different device / somewhere you'll be able to access it. Downloading it to the PC you're going to reinstall your graphics driver on will not help you.
Step 1: Find out which graphics card you have
First things first, you've got to figure out which graphics card you have — the make and model.
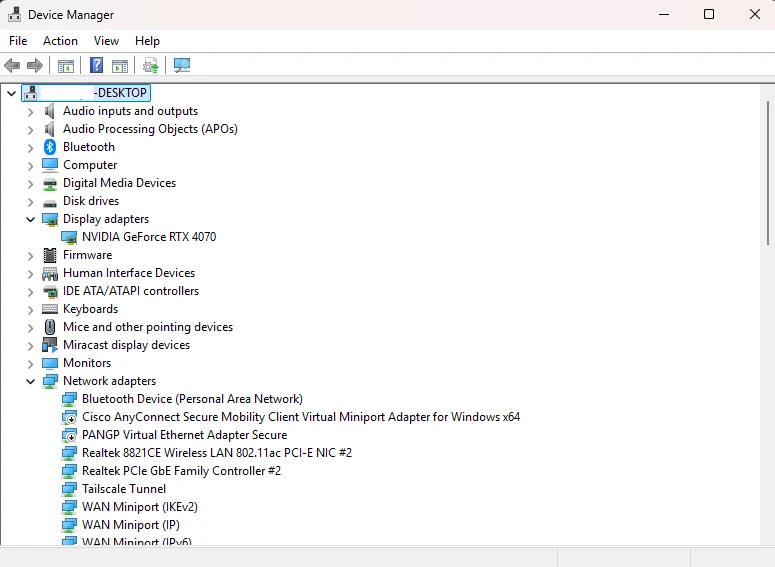
Right-click the Start button and go to Device Manager (or just type "device manager" in the search bar and click it). That'll bring up a box with a bunch of categories — audio inputs, Bluetooth, your computer name, monitors, keyboards, all that type of stuff. Find Display adapters and expand it by clicking the little arrow. You'll see the name of your graphics card — like "NVIDIA GeForce [whatever]." Write that down. That's all you need from here.
Step 2: Download what you need (while you still have internet)
There are two things you're gonna want to download now, while you still have internet — because later you'll reboot into Safe Mode without networking. So do these first and drop them on your Desktop where they're easy to find. Don't save them to OneDrive, because you want them reachable without internet. You know what I'm saying?
a) The cleanup tool (DDU)
First, the cleanup tool I mentioned earlier — DDU, the Display Driver Uninstaller: wagnardsoft.com. After you download it — I'm pretty sure it comes down as a compressed/zipped folder — double-click it, extract it, and drag it onto your Desktop. Again, ideally not into OneDrive.
b) The right driver for your card
Next, get the correct driver for your card. "Correct" is a bit of a simplification — basically you want the last driver that worked. Normally you'd want the newest driver, but this whole fix is operating on the premise that the newest driver is what threw the error in your graphics card. So you want to roll back to the one from before the problems started. Depending on the brand of your card, go to NVIDIA, AMD, or Intel, pick your graphics card, and download the installer to your Desktop.
NVIDIA
NVIDIA drivers (nvidia.com/en-us/drivers). The site has a manual driver search — but you don't want the latest one.
- Search your card (e.g. "GeForce [your model]").
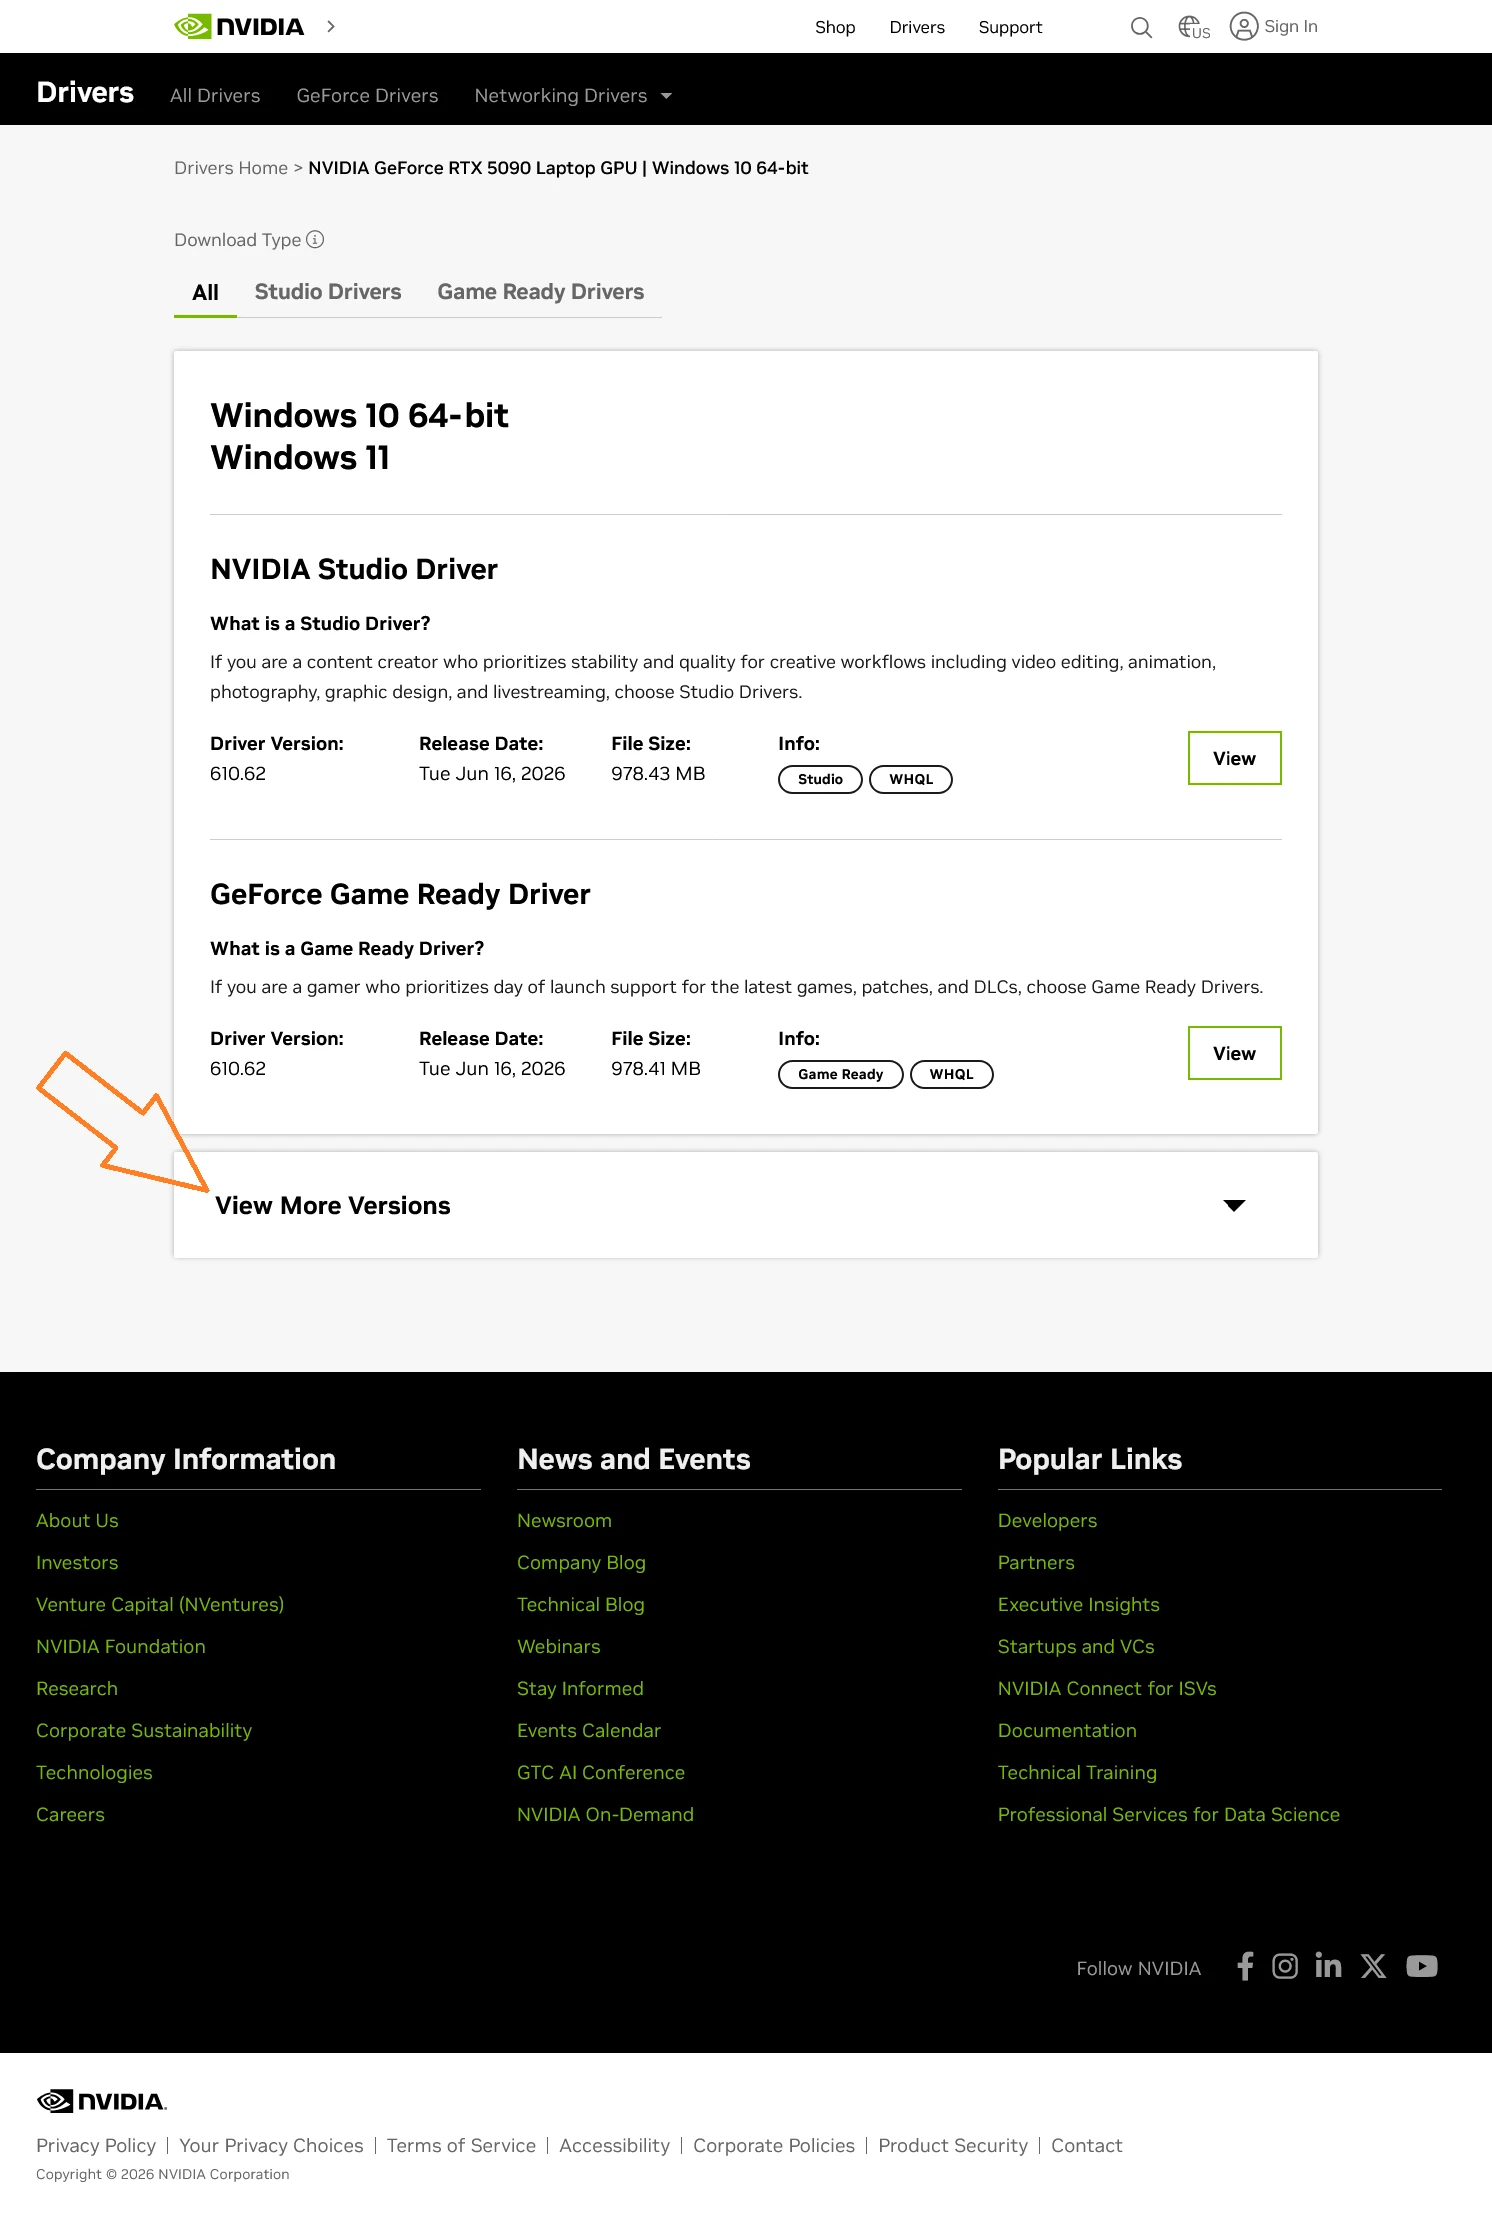
- You'll see Studio drivers (creative work — video editing, animation, design) and Game Ready drivers (gaming). There's not a huge difference; pick whichever fits you.
- Click View more versions to list them by release date.
- Roll back one — to the version that worked before — then click View → Download.

AMD
AMD support (amd.com/en/support).
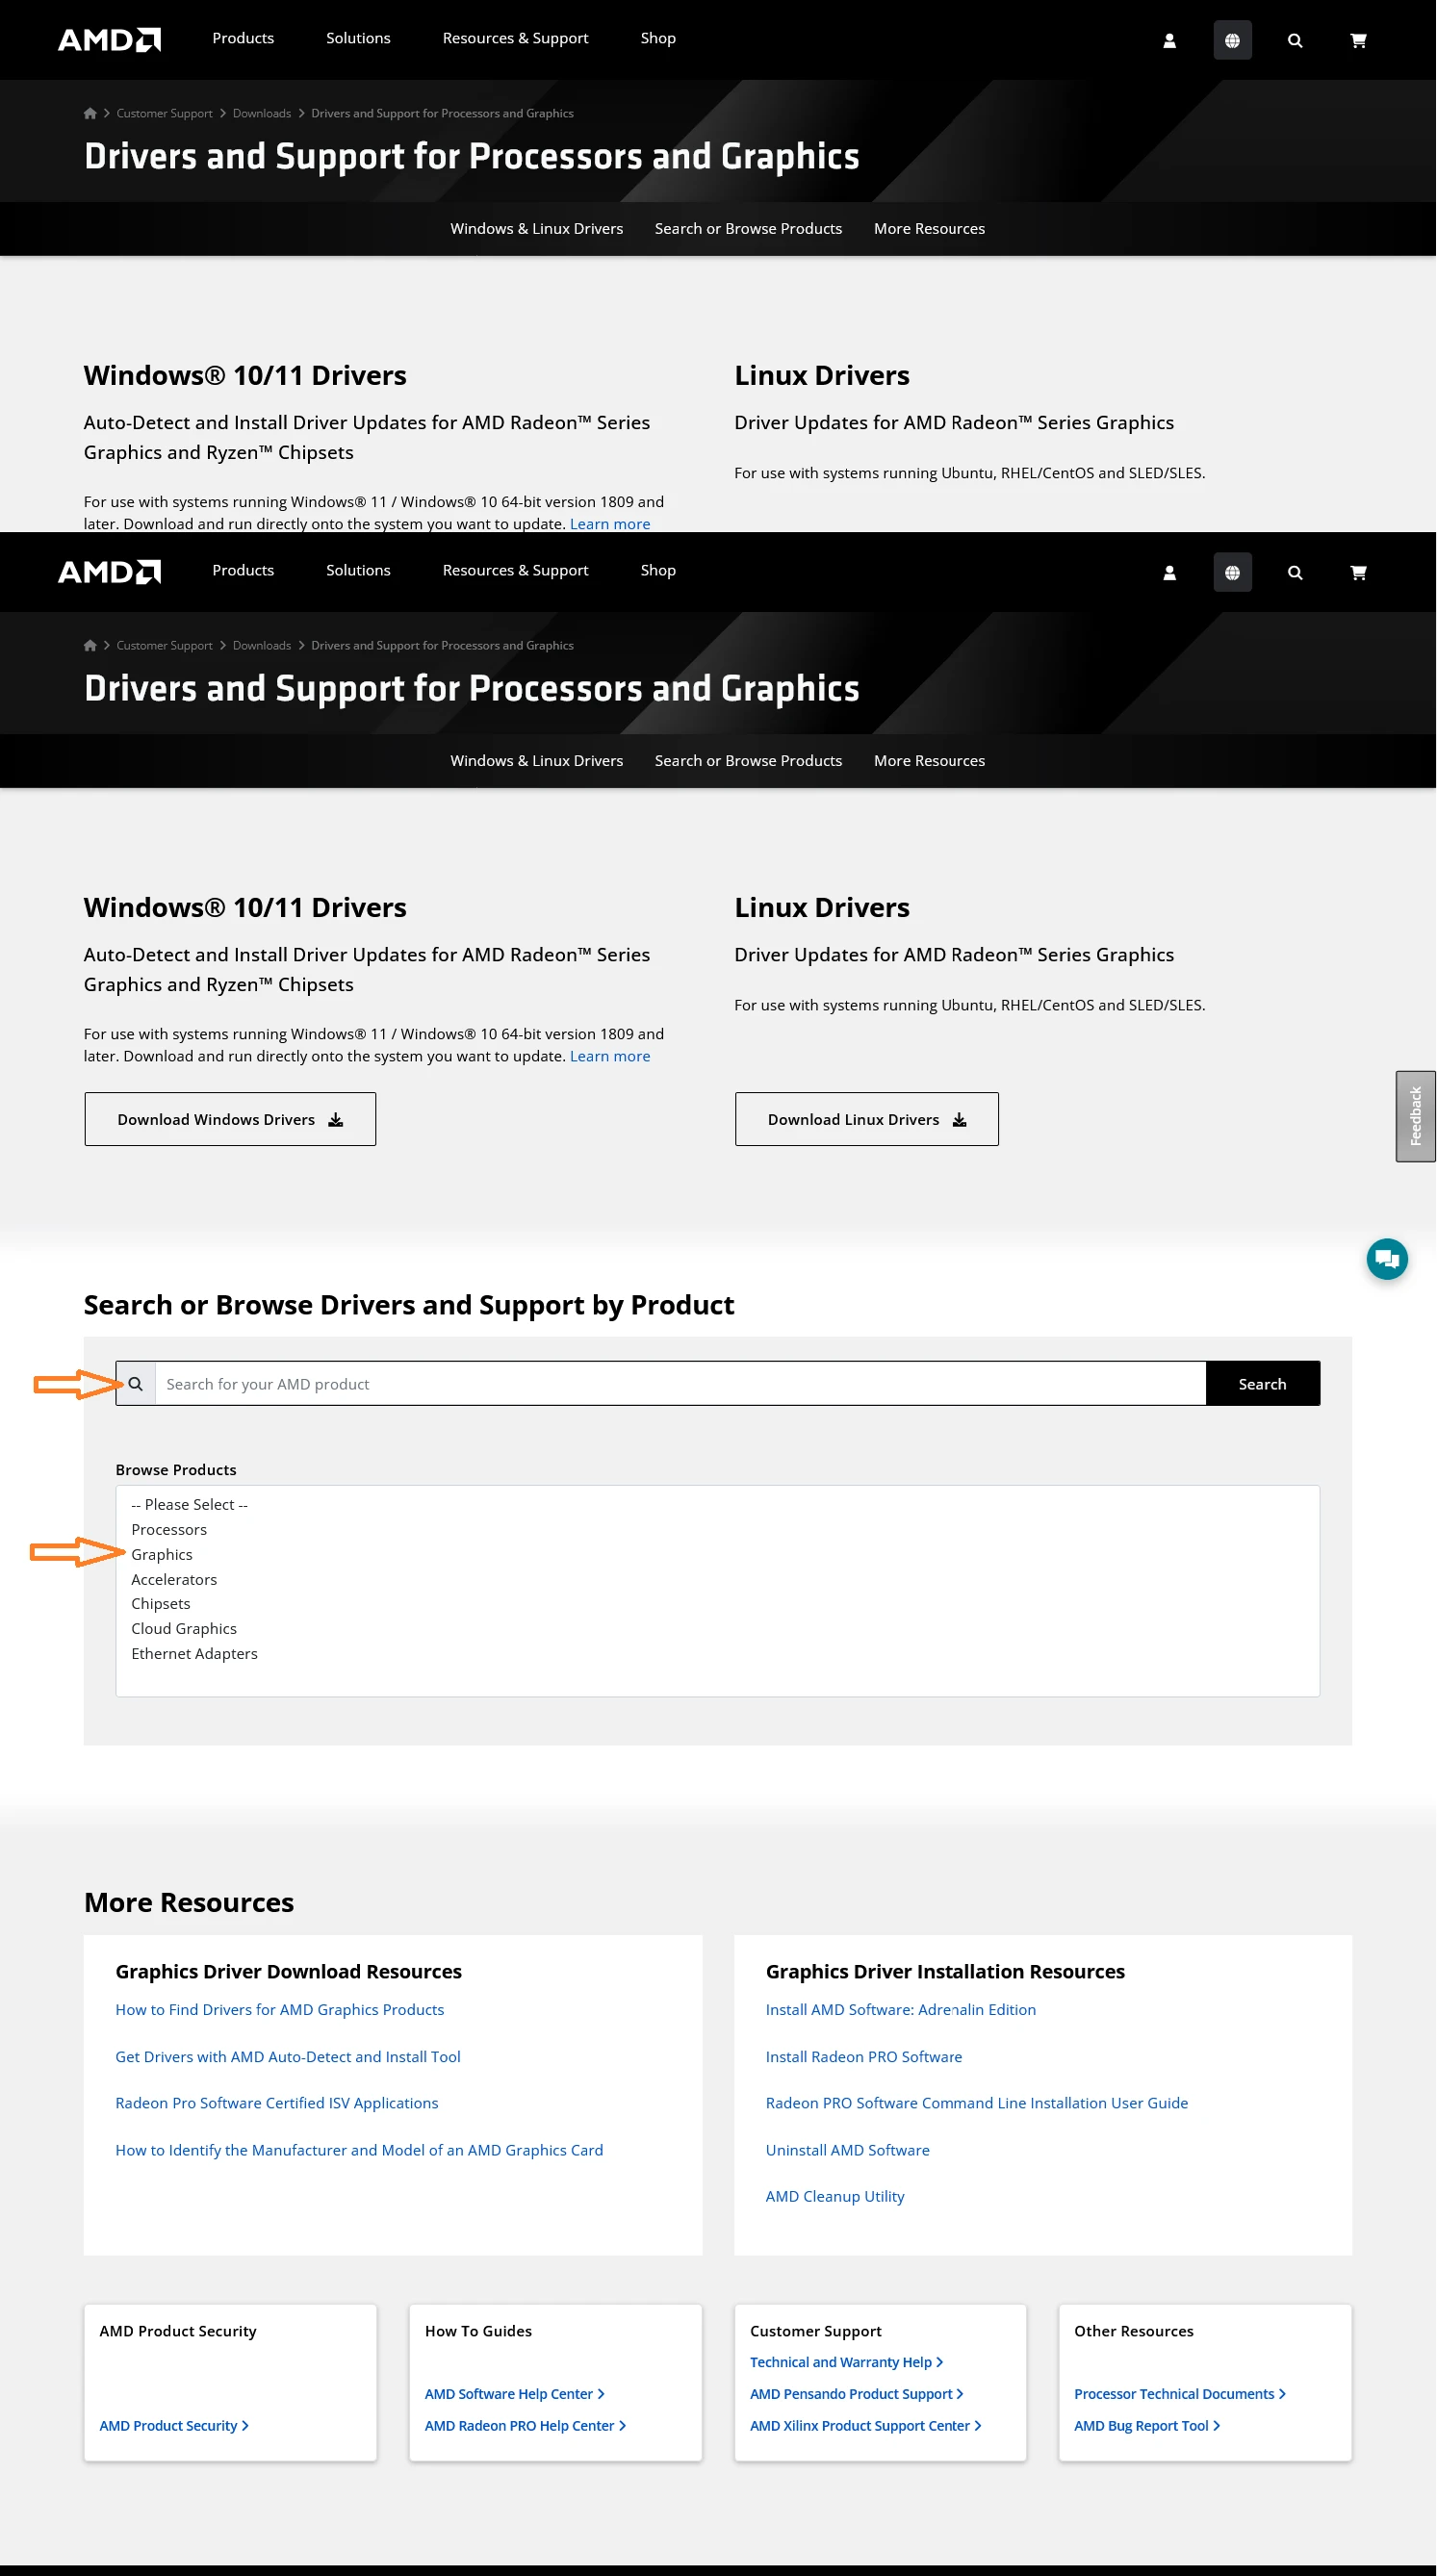
- On the left, click Drivers and Software / Graphics Processors and Chipsets.
- Scroll past the Windows/Linux driver buttons to "Search or browse drivers and support by product."
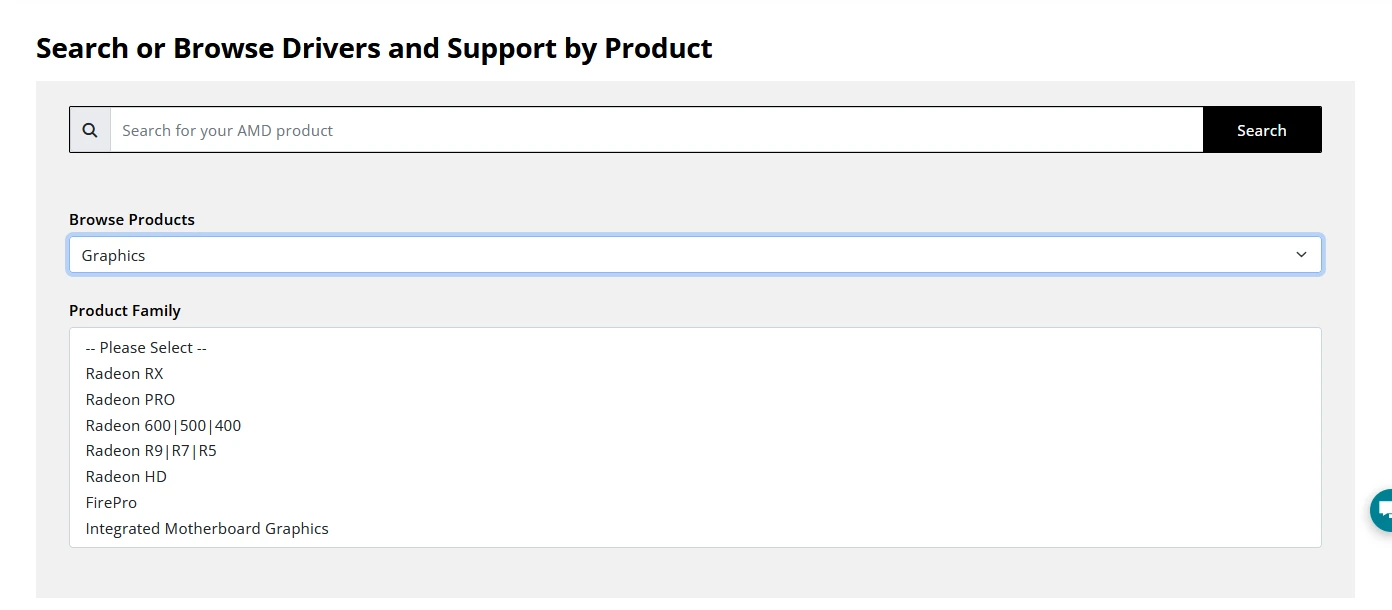
- Choose Graphics, pick your product family (the card you wrote down), pick your series, and hit Submit.
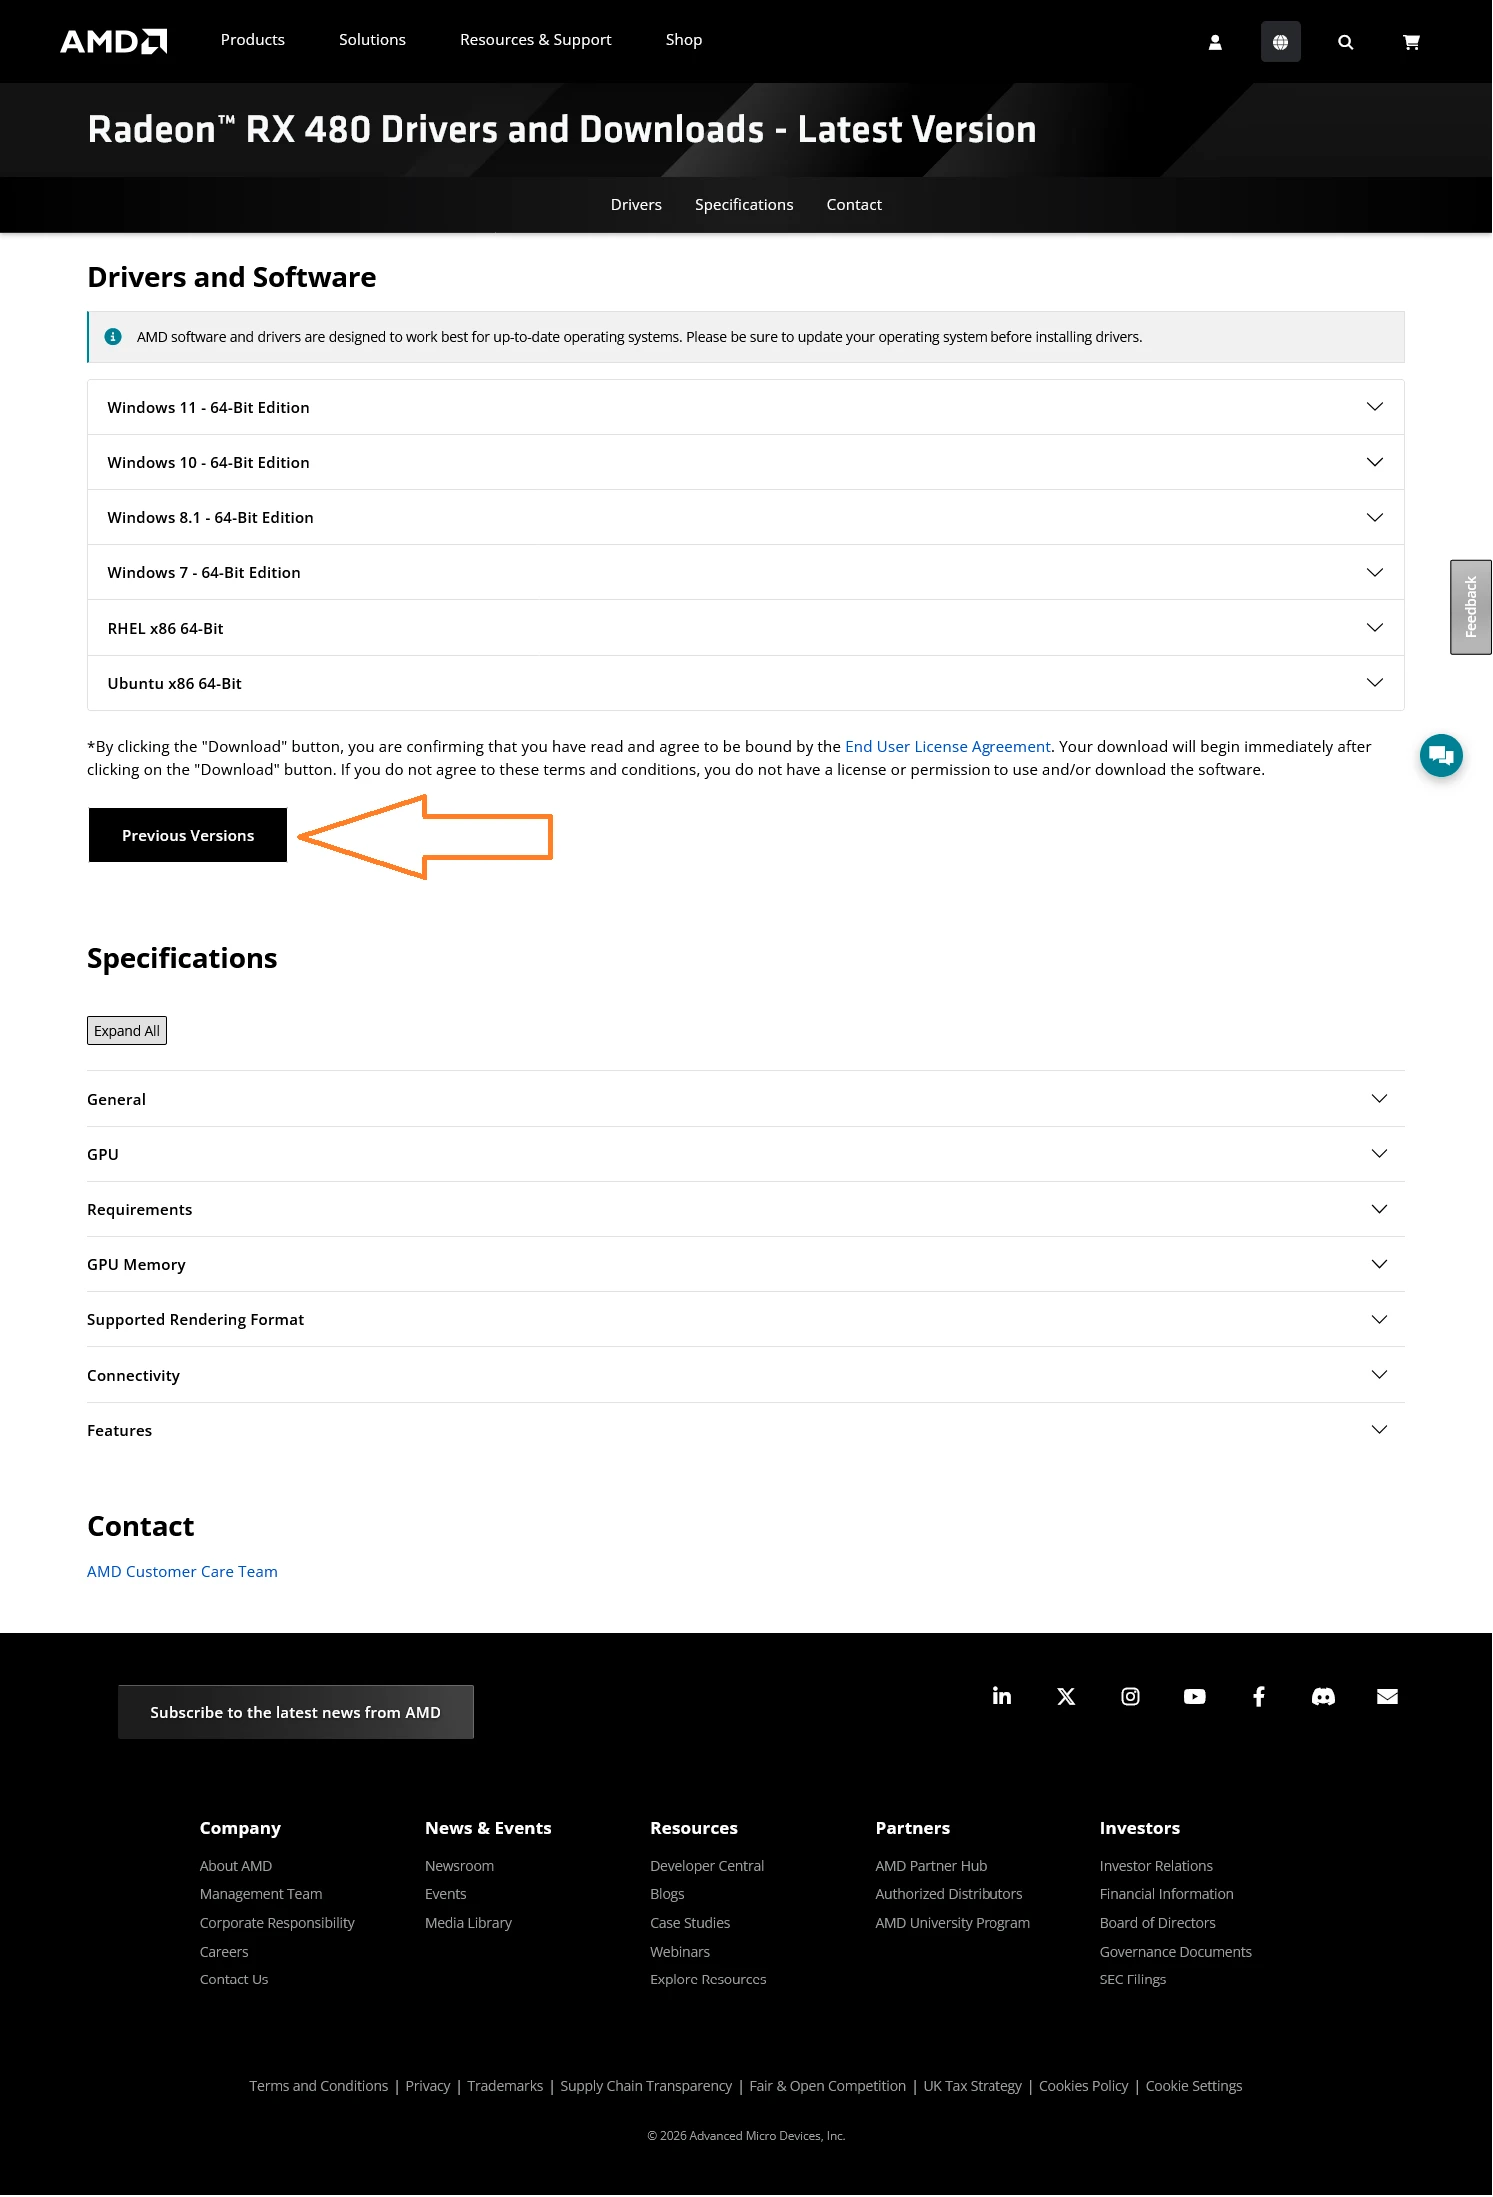
- Scroll down to Previous Versions and expand your OS (say Windows 11).
- Go by release date — same as NVIDIA — and grab the latest version that worked before the issue started.

Intel
Intel download center. If it asks you to sign in or register, just skip that.
- Select your product and click Graphics (or use the auto-detect tool).
- Find your card's make and model (the one you wrote down) and click it.
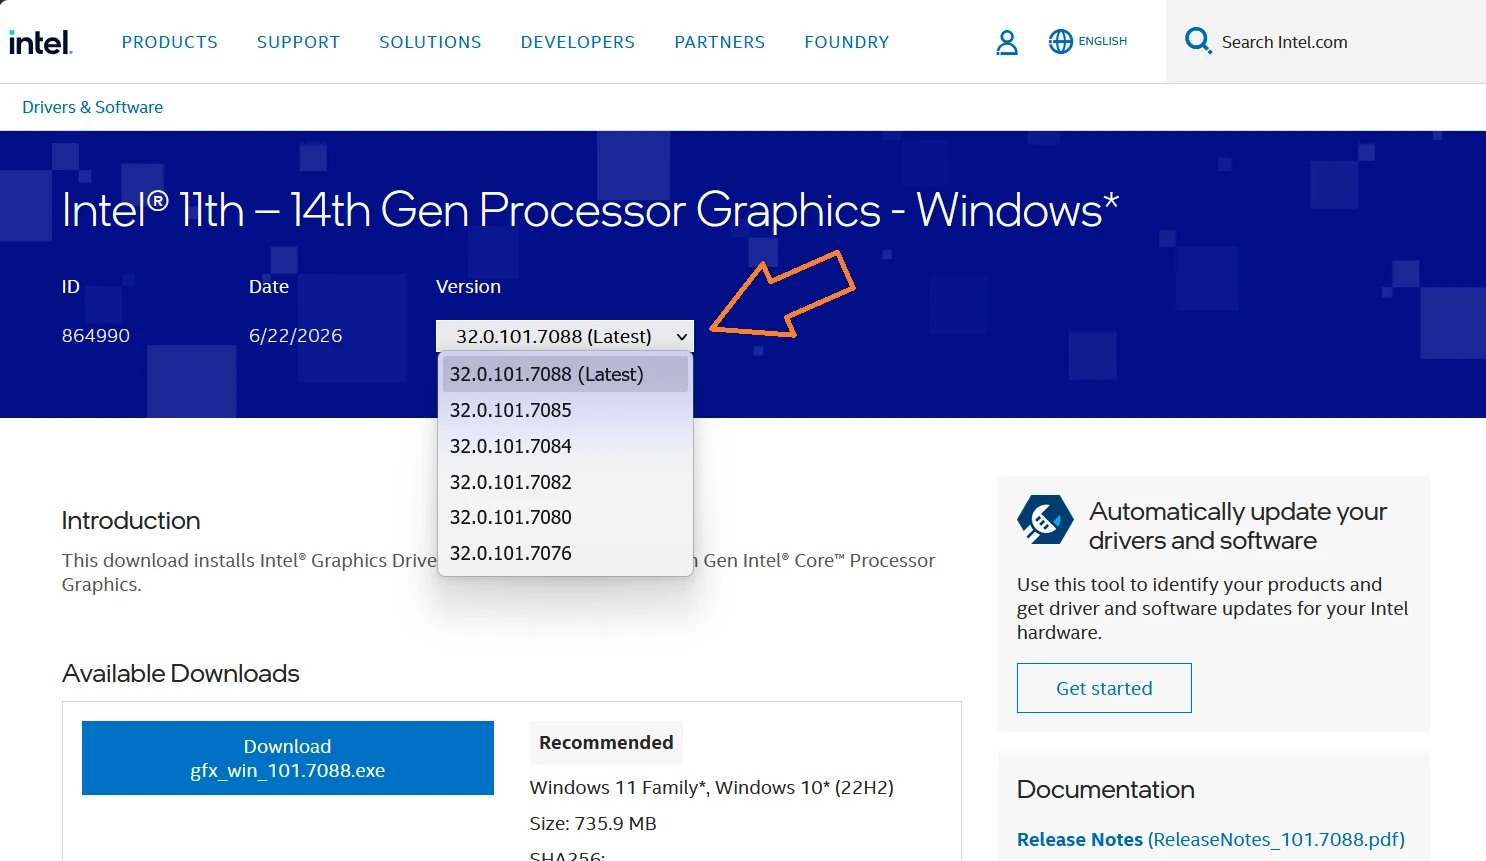
- In the version list, each row shows an ID, a date, and a version. The newest is tagged "(latest)" — roll back to an earlier one that was working for you.
Once you've downloaded your graphics driver, save it to your Desktop right next to that extracted DDU folder.
Pre-flight checklist
Now you're ready to proceed. Quick checklist:
- BitLocker is off, or you have your recovery key.
- DDU is downloaded, extracted, and saved to your Desktop (and make sure that even if it's in OneDrive, it's also downloaded locally to your Desktop).
- You have the correct graphics driver for your make and model — the version from when it was working.
Step 3: Restart into Safe Mode
Next you're gonna restart your computer in Safe Mode. So close everything you've got — save and close.
Method 1 — through Settings.
- Click Start → Settings (or type "settings" in the search bar).
- Click System, scroll down to Recovery, and click it.
- Next to Advanced startup, click Restart now.
- Your PC restarts into a blue screen — click Troubleshoot → Advanced options → Startup settings → Restart.
- After it restarts, you'll see a numbered list. Press 4 for "Enable Safe Mode." (Your mouse won't work here — use the arrow or number keys.)
- Windows boots into Safe Mode, looking plain and basic. That's how you know you're in the right place.
Method 2 — the quicker one.
- Click the Start button, then the Power button (next to your user profile).
- Hold Shift and, while holding it, click Restart.
- Same blue screen: click Troubleshoot → Advanced options → Startup settings → Restart.
- You'll see several Safe Mode choices — boot into Safe Mode, ideally without networking. (If you skipped the downloads earlier and still need internet, use 5 — Safe Mode with Networking.)
Step 4: Wipe the old driver with DDU
- Open the DDU folder on your Desktop and double-click Display Driver Uninstaller.
- A small options window may pop up, possibly noting you're in Safe Mode — that's good. Just click Close on it (the default settings are exactly right).
-
On the right side, set:
- "Select device type" → GPU
- "Select device" → your brand (NVIDIA, AMD, or Intel)
- Click the big button: "Clean and restart."
- DDU removes the old driver and restarts your computer back into normal Windows on its own.
When it comes back, your screen may look large, blurry, or low-resolution. That's completely normal — there's simply no graphics driver installed yet. You're about to fix that.
Step 5: Install the fresh driver
- Back in normal Windows, find the driver installer you saved to your Desktop in Step 2 and double-click it.
- Follow the prompts.
- If it offers Express vs Custom, pick Custom — then tick "Perform a clean installation" if you see it.
- Let it run. Your screen may flicker or go black for a few seconds while it works — that's the new driver taking over. Don't touch anything; let it finish.
- If it asks to restart, say yes.
Step 6: Check that it worked
- Your screen should be back to sharp, normal resolution. That's the main sign of success.
- Want to be sure? Right-click Start → Device Manager → Display adapters. Your card should be listed by name with no yellow warning triangle next to it.
That's it — you've done a complete, clean driver reinstall, the proper way.
If anything goes sideways
A few honest "stop and get help" moments:
- Windows asked for a recovery key and you don't have it → don't keep guessing; that's a lockout risk.
- The screen stayed black and didn't come back after a couple of minutes.
- You're not sure which driver matches your card, or the website offers a confusing list.
- The crashing continues after all this — which usually means the driver was never the real cause, and something else is going on.
- "Just reinstall the graphics driver" is over-recommended — rule out the easier causes first.
- A normal reinstall leaves remnants behind; DDU in Safe Mode strips the driver completely before a clean install.
- If the crashing continues after a clean reinstall, the driver was never the real cause — look elsewhere.